
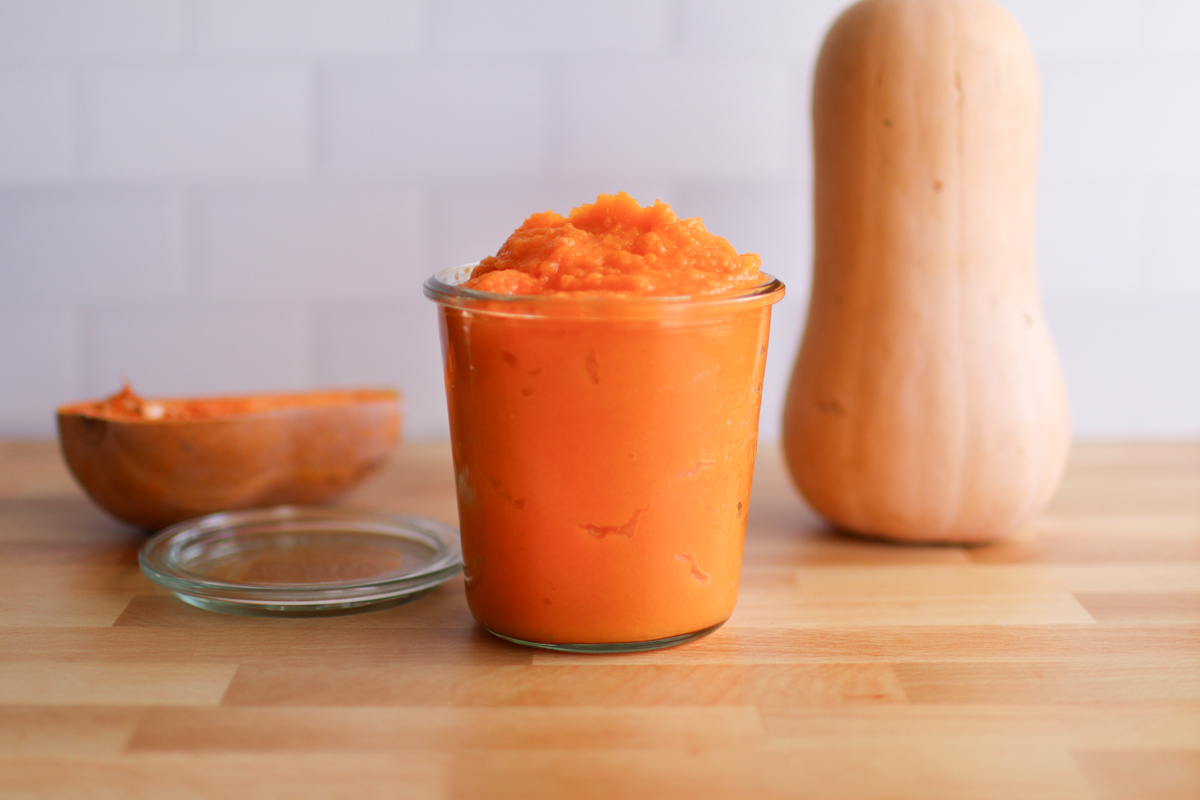
Homemade Butternut Squash Puree | Easy Method
Learn how to make homemade butternut squash puree with this simple tutorial! Pureeing butternut squash is an excellent way to incorporate the squash into recipes or freeze it for later use. Plus, it’s really easy to make!
I always stock up on butternut squash at the grocery store and farmer’s market when it’s in season. It lasts a long time and is a hearty vegetable for the wintertime.
Of course, with so much squash to use up, I’ve had to figure out how to eat it in different ways to have some variety in our meals. My favorite way to enjoy butternut squash is pureed.
Making butternut squash puree each year is a must! There are so many delicious uses for pureed butternut and it’s great to have in the freezer for later.
Why You’ll Love Butternut Puree
- Versatile: You can add butternut squash puree to soups, homemade bread, pasta, oatmeal, and more! It’s so easy to incorporate this puree into your meals for added fiber and its delicious sweet and nutty flavor.
- Easy to make: Making butternut puree takes very little active time! You don’t need special equipment and they are a much more manageable size than pumpkins.
- Freezer-ready: I’m not a huge fan of frozen butternut squash cubes, but puree freezes so well! It’s such an easy way to preserve butternut squash and it’s as good as it was before freezing.
- Better than store-bought: I love making my own puree versus buying a can at the store. It saves money and reduces waste!

What You’ll Need
- Butternut squashes: The source of butternut squash puree! You can use honey nut squash too, but it will need less time to bake.
- Olive oil: You’ll drizzle a little bit of olive oil on the squash before baking. Avocado oil will also work.
- Sharp knife: Cutting winter squash does require some caution, so a sharp chef’s knife is a must.
- Baking vessel: You can use a large cast iron skillet, baking dish, or sheet pan.
How to Make Butternut Squash Puree

Step 1. Using a sharp knife, cut the stem of the squash off and carefully cut it in half.

Step 2. Scoop out the seeds and guts with a large spoon. Save the seeds for roasted butternut squash seeds.

Step 3. Drizzle a little olive oil over the cut side of the butternut squash, then place the squash cut side down on a baking sheet lined with parchment paper. Poke each half a few times with a fork.

Step 4. Bake at 350° F for around 45 minutes until fork tender. The cooking time will vary based on the size of your squash. Remove from the oven and allow to cool completely.
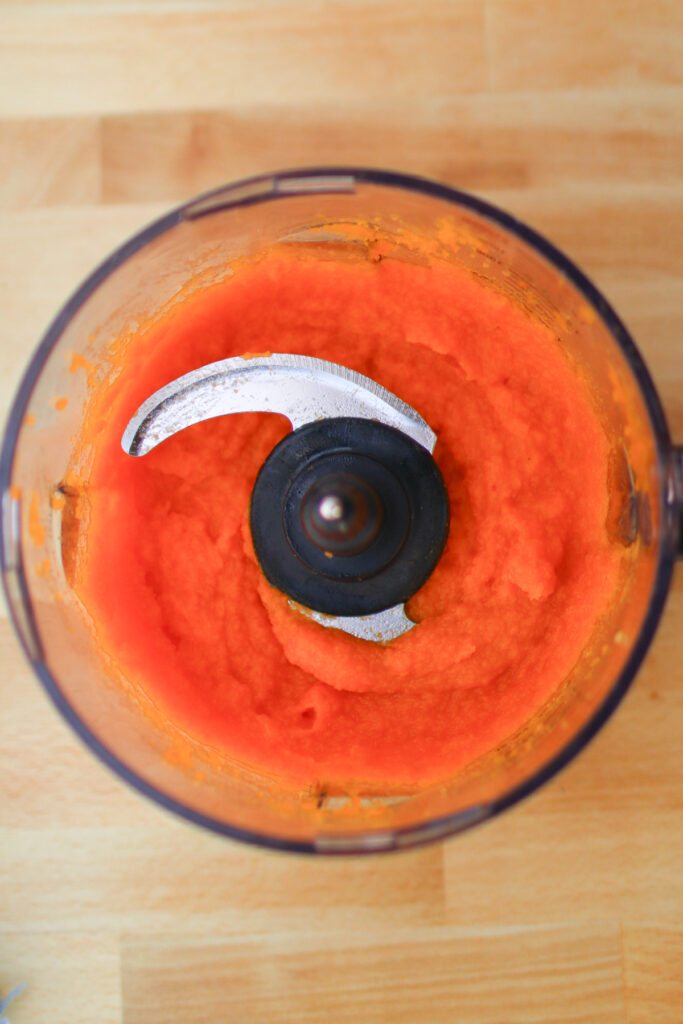
Step 5. Scoop the flesh out of the peel and place in the bowl of a food processor. Process until it’s a very smooth puree.

Step 6. Enjoy the butternut squash puree immediately or store it in the refrigerator or freezer.
Helpful Tips
- Once it cools to room temperature, butternut squash puree can be kept in the fridge in an airtight container for 3-5 days. For longer-term storage, freeze it in a freezer-safe container like a glass jar or a freezer bag.
- You can use a potato masher or an immersion blender if you like, but it will leave a chunkier, less smooth puree.
Uses for Butternut Squash Puree
- Mix with butter, pumpkin pie spices, and a touch of maple syrup (or brown sugar) for an easy vegetable side dish.
- Use in homemade ravioli filling.
- Mix into pasta sauces, mac n cheese sauce, or make butternut squash lasagna.
- Stir into soups to thicken and add flavor, or make creamy butternut squash soup.
- Spread on flatbread pizzas
- Mix into oats for a fall breakfast (like pumpkin spice oatmeal!)
- Use as a substitute for pumpkin puree in your favorite pumpkin recipes
- Make baked goods, like butternut squash muffins or butternut squash bread
- Mix with other purees to make homemade baby food

Recipe FAQs
How do I freeze butternut squash puree?
Scoop the puree into ice cube trays, glass jars, or ziplock bags once cool. Leave a lot of headspace if you’re freezing in glass! To use, let it thaw on the counter or in the fridge and it’ll be good as fresh.
Can I make a puree with any winter squash?
Yep! You can puree just about any winter squash, including acorn squash, honey nut squash, and pumpkins. You can follow the same steps, but you may have to adjust the cooking time depending on the size of the squash.
Related Content
- Roasted Butternut Squash Seeds
- Creamy Butternut Squash Bisque
- Fall Fruit Salad
- Homemade Baked Pears with Honey
- Autumn Spiced Rum Cider Punch
🍁Enjoy the seasonal delights of fall with this easy tutorial! If you try this butternut squash puree tutorial and love it, I’d be so grateful if you could come back and leave a review. Thanks for visiting!

Butternut Squash Puree
Equipment
- Baking dish (a sheet pan, casserole dish, or large cast iron skillet will work)
Ingredients
- butternut squash whole
- olive oil
Instructions
- Using a sharp knife, cut the stem of the squash off and carefully cut it in half.
- Scoop out the seeds and guts with a large spoon. Save the seeds for roasted butternut squash seeds.
- Drizzle a little olive oil over the cut side of the butternut squash, then place the squash cut side down on a baking sheet lined with parchment paper. Poke each half a few times with a fork.
- Bake at 350° F for around 45 minutes until fork tender. The cooking time will vary based on the size of your squash.
- Remove from the oven and allow to cool completely.
- Scoop the flesh out of the peel and place in the bowl of a food processor. Process until it’s a very smooth puree.
Notes
- Once it cools to room temperature, butternut squash puree can be kept in the fridge in an airtight container for 3-5 days. For longer-term storage, freeze it in a freezer-safe container like a glass jar or a freezer bag.
- You can use a potato masher or an immersion blender if you like, but it will leave a chunkier, less smooth puree.


I love using this butternut squash puree in so many recipes! I have several jars in my freezer year-round.