
5 Simple Natural Christmas Decorations
Natural Christmas Decorations: A Treasured Tradition
One of my favorite parts of the holiday season is decorating my house for Christmas! I love the warmth it brings to the space and turning on Christmas music while my husband and I decorate makes for a special evening this time of year. It’s made even more special by our tradition of using natural Christmas decorations.
When we first got married, we lived in a 500-square-foot apartment. We had a bit of auxiliary storage, but our limited space meant we needed to rethink the bins and bins of Christmas decorations that are increasingly common. We didn’t want to spend the money or storage space on loads of reusable decorations, either. That’s when we began decorating with natural items, which has become a tradition ever since! I love the care that goes into gathering natural elements for holiday decor and they bring a little piece of nature into my home during a season in which being outdoors is less frequent.
Benefits of Natural Christmas Decorations
You don’t have to store the decorations
Christmas decorations can take up a lot of storage space for the 11 months out of the year they aren’t in use. Natural decorations are disposed of each year, so you can limit the amount of storage space you need.
They are more eco-friendly
Using natural items in your holiday decorations, when they are properly disposed of, is actually more eco-friendly than reusable. Although reusable is usually considered a greener choice in other areas, when it comes to decorations, reusable choices just add a lot of plastic to the world. Most decorations are discarded or donated after a few years because they are out of style. Even if they are used until they are worn out, we are still left with nonbiodegradable plastic sitting in the landfill for centuries. With natural decorations, they can be composted and feed future plants with rich soil.
They are beautiful
It’s no secret that being in nature offers a wide array of benefits for our physical and mental health. In a similar way, having natural elements in your home is a great way to boost your mood and overall well-being! I don’t believe there’s anything more beautiful than what comes from nature, so why wouldn’t I decorate with it? It’s also so much fun to make easy DIY Christmas decorations rather than just purchasing them!
Natural Christmas Decorations
When you decorate with natural elements for Christmas, there are many different ways you can get crafty and make your home more beautiful. Get creative and try new things. To get you started, here are a few simple ideas and how I like to decorate with natural materials.
This post contains affiliate links. If you make a purchase through the links, I will earn a small commission at no cost to you. As an Amazon Associate, I earn from qualifying purchases. Read my full disclosure here.
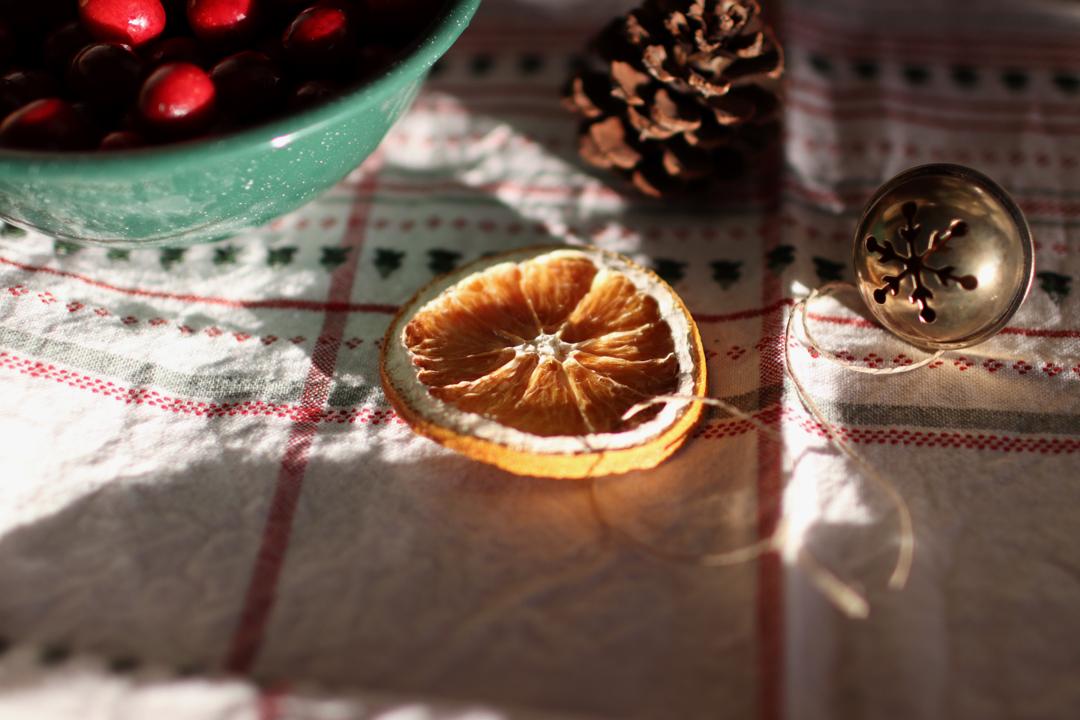
Dried Orange Slices
Dried citrus fruits add such a fun pop of color to your Christmas decorations and look absolutely beautiful with light shining through them. I like to reuse mine for a couple of years before making new ones, but you can also compost them each year and start fresh. While oranges are the most common, any citrus fruit can be dried following the same instructions.

How to Make Dried Oranges
Supplies:
- Baking sheet
- Oven-safe cooling rack (optional)
- Knife
- Wash your oranges and remove the produce stickers.
- Slice the fruit horizontally so the core is going through the center of each slice. Aim for ⅛ – ¼ inch (about 3 – 6 millimeters) thickness and try to keep the knife straight so the slices are even. Uneven cuts can result in half the slice being burnt while the other half is not dry.
- Pat orange slices gently with a tea towel to remove as much of the juice as possible
- Lay slices out on a sheet pan lined with parchment paper or a silicone baking mat. If you have an oven-safe cooling rack, you can set that on the baking tray and place the fruit on the rack. The air circulation will help them dry out faster and more evenly.
- Bake in a preheated oven at 200°F. Prop the door open with a wooden spoon (the door should be open 1-2 inches wide) so the humidity can escape easily.
- After two hours have passed, start checking the fruit every 30 minutes. Once it is completely dry, remove it from the oven and let cool. Some slices will dry faster than others, so remove them as they are dry.
- Once cooled, ensure that all of the moisture is out of the fruit by touching the fleshy parts. If any of it is soft or pliable, bake them longer.
Notes:
- If your orange slices are browning but not getting dry, that likely means your oven is too hot or your oranges are too thick. Try turning the oven down to its lowest setting.
- You may have some stubborn slices that won’t dry. Try turning off the oven and letting them air dry overnight. I’ve found that if the oranges get close to being dry in the oven, air drying works well to finish dehydrating them.
How to Use Dried Oranges
Dried oranges are very versatile; they look great as gift embellishments, food garnishes, natural ornaments, and on garlands.
How to Make an Orange Slice Garland
Once oranges are dried, you can easily poke holes in them using a pencil or toothpick. Poke two holes on either side of each orange slice and thread the string through each hole. Having two holes causes the oranges to lay flat in the garland.
Evergreen Branches and Sprigs
Nothing says Christmas more than evergreens! They are a beautiful addition to your natural Christmas decorations and make your house smell wonderful, too. You can use pine branches on mantels and centerpieces or make an evergreen garland with them. Smaller evergreen sprigs can be made into evergreen wreaths (learn how to make your own wreath below) or swags. A fun way to use up smaller sprigs is placing them in a mason jar filled with water and a layer of cranberries floating on the top. It’s the perfect addition to a centerpiece, mantel, or table settings.
How to Make a DIY Wreath
Supplies:
- A wreath base
- Green florist wire or other pliable wire
- Fresh greenery
- Decorative elements as desired (dried oranges, twine, velvet ribbon, pinecones, etc.)
- Gather a small bunch of greenery sprigs and attach them to the wreath base by twisting the wire around them, about two inches from the cut end of the sprigs.
- Repeat step one, moving along the wreath. Make sure the greenery is always pointing in the same direction and each new addition covers the cut end of the previously attached cuttings.
- Repeat step two until the whole wreath is covered in greenery.
- Attach decorative elements with wire or string.
- Hang on a door or wall

Popcorn and Cranberry Garland
Strings of popcorn and cranberries add a beautiful, old-fashioned charm to your Christmas decorations. You can use these garlands around the house or on your Christmas tree.
Get a spool of thread and a sewing needle to make a cranberry and popcorn garland. Gather fresh cranberries and air pop some popcorn*. Push the needle through the round part of the popcorn kernel and through the center of the cranberries. Make the garland as long as you wish, then cut the thread and tie the ends into loops.
When it’s time to compost this garland, remove the string from the popcorn and cranberries and trash it if the thread has polyester in it.
*If you don’t have an air popper, you can use the microwave. To do this, pour ½ cup of popcorn kernels into a large glass bowl and cover it with a plate. Microwave for 5-6 minutes until you stop hearing constant popping. Remove from the microwave with hot pads and remove the plate. Allow the popcorn to cool before using it.
Poinsettias and Paperwhites
Flowers aren’t usually associated with Christmas, but these beautiful blooms are an exception! Poinsettias’ bright red blooms and the dainty white clusters on paperwhites are a fun, floral decoration to your holiday home.
How to Grow Paperwhites
- Place the bulbs in a bulb vase or other glass vessel with the roots pointed down and the pointed tip facing upward.
- Fill the vessel with water so that the bulbs are covered about ⅓ of the way up. If you aren’t using a bulb vase, you may need to fill the vessel with rocks to keep the bulbs standing upright.
- Place the bulbs in a warm, sunny spot and keep them topped off with fresh water. In a few weeks, you will have paperwhite blooms!

Other Natural Decorations
There are so many bits and bobs from nature that I like to include in my Christmas decorations! Gather up mason jars, baskets, and festive bowls, and get creative with them. You can fill a bowl with water and cranberries, then light floating candles in it for a tablescape or stock cinnamon sticks in mason jars. Pine cones, acorns, and winter berries look especially festive during Christmas time and make beautiful Christmas tree ornaments! Fill baskets with fresh fruits of the season, such as pomegranates and persimmons. Even dried sticks, scrap wood, and wood slices can add beautiful, natural elements to your holiday decor. The best part of natural Christmas decorations is how creative you can get with them, so let your imagination run wild.
Christmas Traditions
Decorating with natural items each year is one of my favorite Christmas traditions, but I have many and add to the list quite often! Traditions are a special way to connect with loved ones, have something to look forward to, and observe the rhythm of the seasons.
I’ve partnered with ten other amazing creators to share our treasured Christmas traditions as we enter into the holiday season! There are so many fun ideas, such as making homemade Christmas pajamas or crafting beautiful, scented salt dough ornaments. To read about more special traditions and how you might incorporate them into your holiday rhythms, check out the rest of the ideas over at A Lovely Place Called Home.
Wishing you a Merry Christmas and happy decorating!